Affiliate disclosure: As an Amazon Associate, Soccer Training Net earns from qualifying purchases. The Amazon product link on this page is an affiliate link.
The original draft described a conventional rigid goal assembled from bottom bars, vertical posts, corner joints, a crossbar, and rear support poles. That is not how PowerNet’s published portable-goal frame is organized. The official guide shows a hinged base, locking side legs, paired upper and lower tension poles, net sleeves, pole holders, and top loops that hook onto pole notches.
PowerNet also warns that the poles are under tension, moving parts can pinch, and the equipment should be stored after use rather than left outdoors. Read the complete manufacturer instructions before starting and keep children away from the frame while an adult or capable user handles the tensioned sections.
View the PowerNet target goal on Amazon ↗ · PowerNet soccer assembly instructions ↗
Before setup: confirm the model and location
Check the product identity
This guide is intended for the PowerNet 6×4 Numbered Soccer Target Goal, SKU 1236. PowerNet sells several goals that look similar but use different nets, frames, and accessories. Confirm the label, order record, and included instruction sheet before using instructions intended for another model.
Choose a safe setup area
Select a level area with enough clearance in front of, behind, and beside the goal. Remove rocks, toys, sprinkler heads, branches, and other trip or impact hazards. Keep the shooting lane away from windows, vehicles, streets, pets, and people who are not participating.
Do not set up merely because a surface is flat. The location also needs an anchoring or weighting method approved for the product and surface. Stop if wind or ground conditions make stable use uncertain.
Inspect the bag before building
PowerNet’s published portable-goal instructions identify a frame and net, four upper poles, four lower poles, and a carry bag. The Numbered Target Goal product page also lists two handled weighted sandbags, while the exact included components should be confirmed from your package.
Lay everything out without forcing any part. Check for cracks, bent hardware, frayed fabric, damaged elastic, missing locking buttons, torn sleeves, or an incomplete target panel. Photograph the package label and components if you need help from customer support.
Safety points that matter
- Tensioned poles can spring: keep your face and other people out of the pole’s path during assembly and breakdown.
- Hinges can pinch: hold the frame by safe gripping areas and keep fingers away from locking and sliding parts.
- Do not force the center flat: PowerNet says the raised, curved center near the hinge is intentional and contributes to stability.
- Listen and look for locks: locking buttons should engage as shown in the manufacturer’s instructions.
- Stabilize before shooting: the goal should never be used unsecured.
- Do not climb or hang on it: it is a portable training goal, not playground equipment.
Step-by-step setup
Step 1: Position the hinged frame and spread the net
Remove the frame-and-net assembly from the bag. PowerNet’s frame guide begins with the double-hinge bracket on the ground and the net spread away from the user. Make sure the fabric is not wrapped around a hinge or trapped under the base.
Step 2: Open and lock the base frame
Lower one side leg to the ground, then repeat on the opposite side. Extend or open the frame sections in the order shown by PowerNet until the center-hinge buttons engage. Swing the side legs outward until each locking point clicks into position.
The published guide notes that the center of the frame is designed to remain raised and curved. Do not stand on it or push it flat. If a lock does not engage, stop and realign the parts rather than forcing them.
Step 3: Pair the upper and lower poles
Connect one upper pole to one lower pole. Repeat until you have the pole pairs required by the frame. Work with one pair at a time and keep the remaining tension poles on the ground where nobody can step on them.
Step 4: Feed the front poles through the net sleeves
PowerNet’s guide shows the connected pole sliding through a net sleeve before the bottom loop is placed around the front pole holder. Check that the sleeve is not twisted and that the numbered target panel faces the shooting side of the goal.
Insert the connected pole into the front holder and repeat on the opposite side. Do not substitute improvised clips, zip ties, or knots unless PowerNet specifically authorizes them.
Step 5: Install the rear poles
Connect another upper and lower pole, then insert it into a rear pole holder. Repeat on the opposite side. Control the pole throughout the movement; do not release a bent tension pole until it is secured in the correct holder or loop.
Step 6: Secure the top net loops
For the front poles, slide the net sleeve upward and hook the white top loop around the silver notch, following the official diagram. Repeat for the other front pole. Secure the rear top loops to their corresponding notches while maintaining a firm grip on the poles and net.
PowerNet notes that an upper pole may be bent inward slightly to make the loop easier to attach. This is a controlled tensioning movement—not a reason to sharply kink, twist, or overbend the pole.
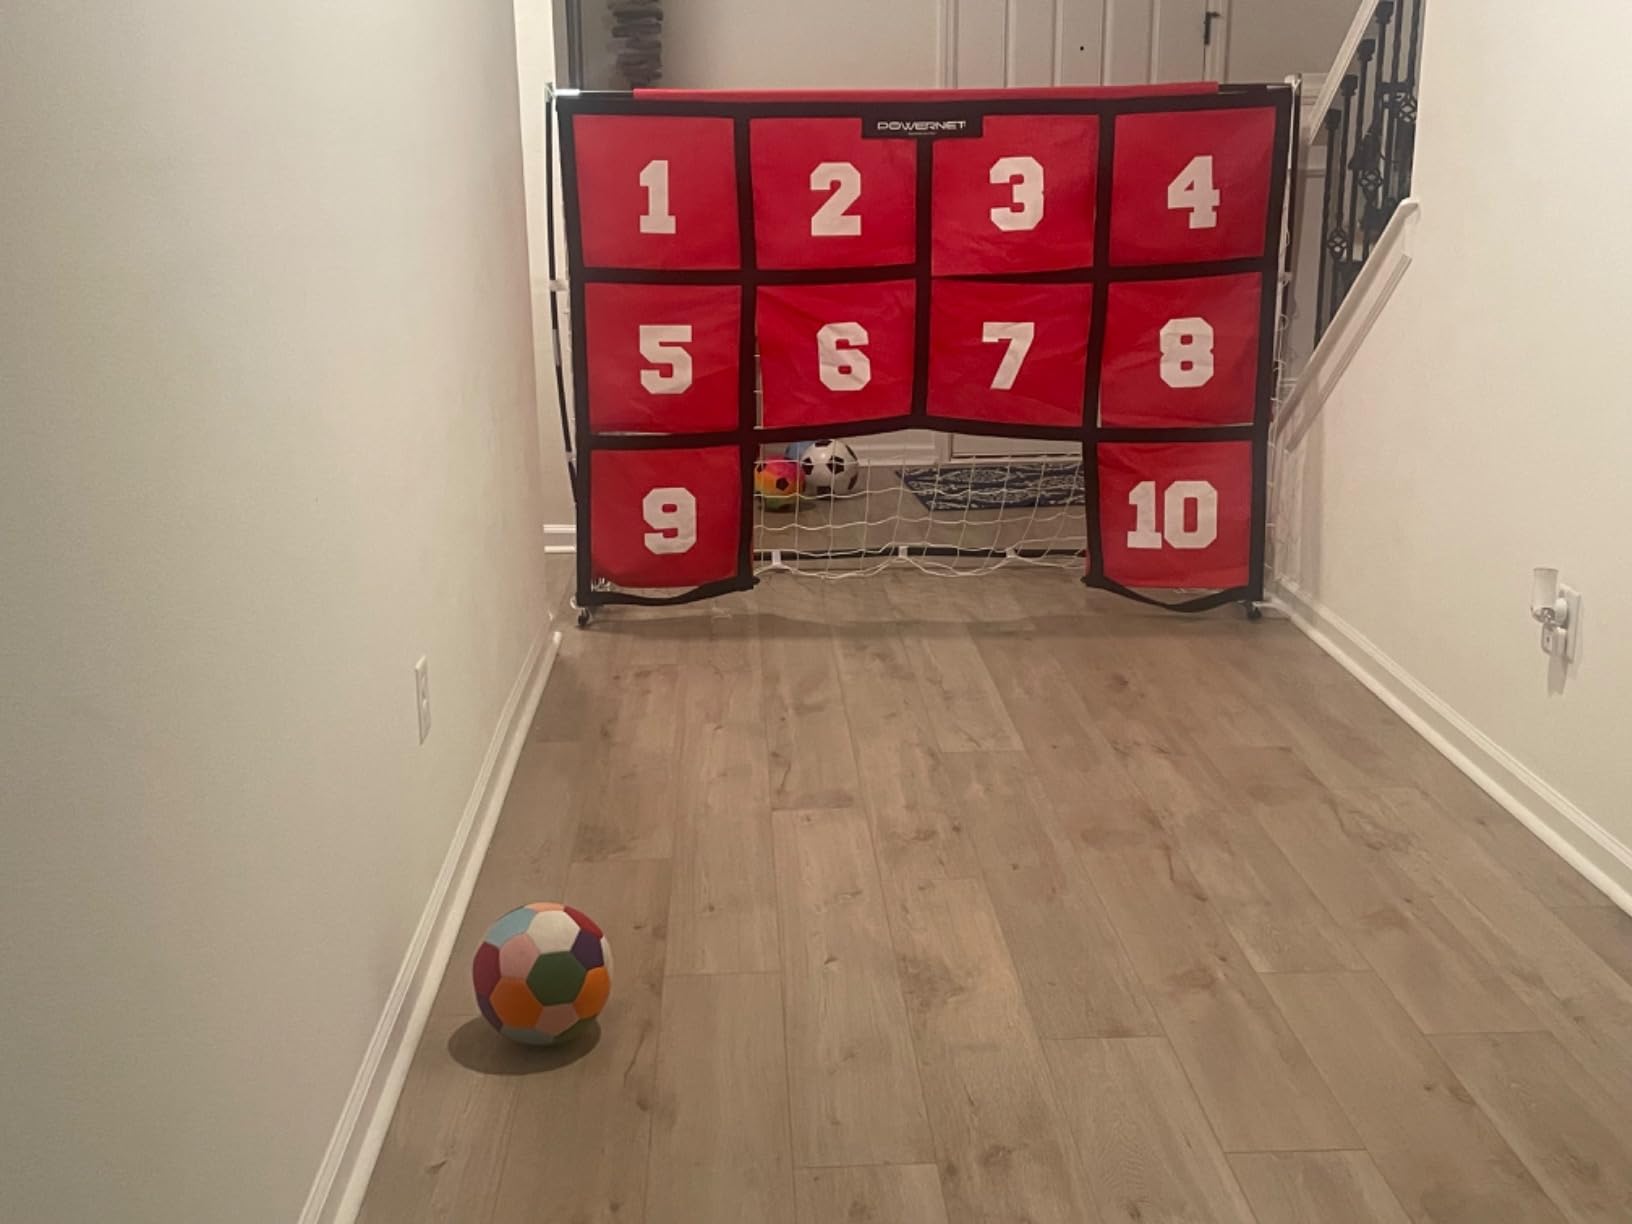
Step 7: Align the numbered target panel
Confirm that all ten numbers face the player, the target openings are not folded, and the panel is centered without being caught around a pole or hinge. The Numbered Target Goal uses an integrated target-and-net assembly; secure its supplied loops, straps, hook-and-loop closures, or lower bungee only where the included model-specific instructions show.
Do not pull the fabric merely to create a perfectly flat appearance. The correct goal is secure attachment and even alignment without overstressing seams, closures, or pole sleeves.
Step 8: Stabilize the goal
Position the goal on the selected surface and use the supplied PowerNet sandbags as instructed. If your exact package also includes ground stakes, use them only in compatible ground, through the designated points, and in the orientation shown by the model instructions.
Do not drive stakes into artificial turf, concrete, buried utilities, irrigation lines, or any surface where penetration is prohibited. Do not assume a random weight, brick, or improvised tie-down is safe. Ask PowerNet which stabilization method is approved when the included options do not suit the location.
Step 9: Perform a hands-on inspection
Before anyone shoots, walk around the goal and verify:
- Every required locking button is fully engaged.
- The base and side legs are in their intended positions.
- Each pole is seated in the correct holder.
- Top loops and closures are attached as instructed.
- The target panel faces forward and is not twisted.
- The net and sleeves are clear of hinges and sharp edges.
- Sandbags or approved anchors are correctly positioned.
- The goal remains stable under a gentle check without lifting or shifting.
Reinspect after moving the goal, after a hard impact, and whenever the ground or weather changes.
First-session check
Begin with several controlled passes or moderate shots rather than immediate maximum-power strikes. Watch how the frame, target panel, rear net, and weights respond. Stop and correct any movement, slipping loop, unusual pole bend, or fabric snag before continuing.
Set a clear shooting line and retrieval path. Only one player should shoot while the goal area is clear, and nobody should retrieve a ball from behind the net until the next player has stopped.
Common setup problems
| Problem | What to check |
|---|---|
| Center of the base looks bowed upward | This is intentional in PowerNet’s published frame guide; do not force it flat. |
| Hinge or leg will not lock | Remove tension, realign the section, keep fingers clear, and confirm nothing is trapped. |
| Top loop is difficult to hook | Use the controlled inward bend described by PowerNet while firmly holding the pole. |
| Target numbers face backward | Stop before fully tensioning, remove the affected poles, and correct the net orientation. |
| Net sleeve is twisted | Release the pole carefully and feed it through again; do not force fabric around the pole. |
| Goal moves during test shots | Stop shooting and verify approved sandbag or stake placement and the weather conditions. |
| A component appears missing or damaged | Do not improvise; use PowerNet’s support or replacement-parts process. |
How to take the goal down
Clear the area and remove all balls before releasing tension. Remove sandbags or approved anchors, then reverse the model instructions in a controlled sequence:
- Hold each pole securely before releasing its top loop.
- Remove rear and front poles from their holders without letting them spring.
- Slide poles out of sleeves and separate upper and lower sections as directed.
- Fold side legs and hinge sections only after their locks are deliberately released.
- Keep fingers clear of hinges and moving tubes.
- Arrange the net so it is not trapped or sharply pinched in the folded frame.
If a component resists, stop and find the lock or source of tension. Pulling harder can damage the goal or cause a sudden release.
Cleaning and storage
Remove loose dirt and debris, then clean only by methods compatible with PowerNet’s instructions. Allow wet fabric and equipment to dry before closing it in the carry bag. Check that sandbags are intact and that no loose sand or moisture will damage other components.
Store the bag in a dry location where the poles will not be crushed or bent. PowerNet says its portable equipment should be taken down after use and not left outside. Extended sun, wind, rain, and improper storage can contribute to damage and may affect warranty coverage.
Setup mistakes to avoid
- Using generic rigid-goal instructions with a hinged tension-frame PowerNet.
- Forcing the raised center hinge down to the ground.
- Working directly in front of a bent pole under tension.
- Allowing children to handle locks and poles without appropriate supervision.
- Using the goal before all locks, loops, and supports are checked.
- Hammering stakes into an unknown or incompatible surface.
- Using unapproved improvised weights or tie-downs.
- Leaving the portable goal assembled outdoors between sessions.
- Packing damp fabric into the carry bag.
Final setup checklist
Ready to train?
- Correct model and instructions confirmed
- Frame opened and all locks engaged
- Center hinge left in its designed raised position
- Poles seated and top loops secured
- Numbered target panel aligned forward
- Sandbags or approved anchors installed
- Safe shooting and retrieval zones established
- Goal tested with controlled shots
Final thoughts
The PowerNet is designed for quick portable setup, but “quick” should never mean rushed. The important sequence is to identify the exact model, control every tensioned part, confirm each lock and loop, stabilize the base, and inspect the complete goal before shooting.
Once the goal is ready, try our five numbered-target accuracy drills. For buying guidance, see the PowerNet pros and cons, 6×4 goal-size guide, and complete product review.